wooden boat kit

The Classic Cajun Pirogue
Dear Uncle John


A pirogue modified to be historical.
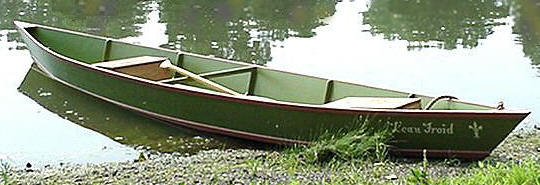
 

I had a great time building my pirogue & enjoy using it.  I also field lots of questions about it & have been asked to display it at various historical events.  In fact, this weekend alone, three groups asked me to display it at their events!  I'm looking forward to building my next pirogue.

 
Thanks!
Frank Petruso
Florissant, Missouri

 
click images to enlarge
 

Thought you might like to see my pirogue just finished. 

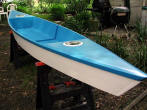
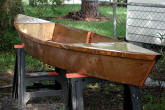
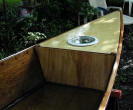
The two end compartments are fiber glassed and quite water proof with a waterproof hatch for each one.  The space inside is ideal for carrying camera, lunches, water, fishing apparatus, etc.  Also they serve as good flotation if needed.

The hatches are available at West Marine for about $10 each. They have a screw in top either clear or solid.  I painted mine with Valspar from Lowes---100% acrylic, latex, high gloss.  And using a good brush and roller there are no brush marks visible.  A quart each of the two colors is ample with a small bit of touch up paint remaining.

I plan to build another one as soon as I decide on which model. Thanks for a great and fun loaded project.  I bought all my glass and resin from Raka and they were great help.  Cordially, John Steinmeyer.


click image to enlarge

wider Pirogue1.jpg (49563 bytes) wider Pirogue2.jpg (51371 bytes)

 I have finally finished my pirogue.  It took me about 40 hours over 4  weeks.  It is a little under 16 feet long and a little more than 65  pounds.  It weighs more because I've added a few things that you can see  from the pictures.  They are the inner rub rail, decks, handles, seats  (removable) and an additional rib.  I wanted to make it a little wider  for more stability so I pushed the middle rib closer to one end and  added one of my own.  I also fiber glassed the entire bottom and most of  the inside.  There is also a keel that the pictures don't show.

 Anthony Zeller


Tim Ragonese didn't send us many comments
but his glassing is some of the finest we've seen.

click image to enlarge
w6.jpg (26322 bytes) w4.jpg (18784 bytes)
w5.jpg (44844 bytes) w1.jpg (25531 bytes) w2.jpg (30931 bytes) bbow.jpg (172293 bytes) bbowlng.jpg (160702 bytes) bvirt.jpg (89624 bytes) bside.jpg (97335 bytes)


click image to enlarge

gboat.jpg (45447 bytes)2nboat.jpg (44590 bytes)I thoroughly enjoyed making our canoe from your kit.  My woodworking background is that of a real novice, so if I could build this, anyone can. We used 1/4" birch plywood, with one layer of fiberglass over the entire bottom, and a 4" strip covering the seams on the interior.  I finished off the bottom of the boat with 2 more coats of epoxy, including 2 coats on the sides as well.  We went ahead and made the 16' length, which easily will carry 3 teenagers, as my kids and their friends found out. My daughter wanted some seats built in, so I did attempt this.  I used 1x2 pieces on the side boards, notched to receive 1x2 pieces that support the seat, which I made out of left over's from the plywood used for the rest of the canoe.  I was glad that I designed them to be removed because it turned out that I mounted them too high, and this proved to be a lot more unstable than I figured. However, sitting or kneeling directly on the bottom proved to be much more stable, more so than I actually anticipated. For the gun-rail, I used a 16' piece of 1x4 exterior trim board, ripped the length.  I sanded down the rough portion, but not completely, then used a router to round the edges.  This made a good "rustic" finish and feel. The rubrail, gunrail and entire interior was finished with 3 coats of Marine Varnish. To help with transporting and hooking up small anchors, I used a 6" long eye-hook, and routed out a slot for the upper half of the eye to protrude through the little "decks", also made from left over plywood.
     Overall, this did cost more than your low estimates, but I planned on that anyway.  I would guess closer to $175-$200 with the amount of epoxy and varnish I used, but I really like the way it turned out.
      These are pictures from the maiden voyage on our favorite lake, Wrights Lake.  We're at 7,000 foot elevation, just below the crest of the Sierra Nevada range in California.

Wayne in California


  rudholm.jpg (29471 bytes)

James M Rudholm of Kingsburg CA has a wonderful site showing one of the best step by step series of building our Pirogue. 

 Click here .


Chris Boss from Wytheville, Virginia not only sent us photos but designed his own web page for us to post. To see Chris's boat and read his comments,
 Click here .


click image to enlarge
coleman1.jpg (52553 bytes)
coleman2.jpg (58275 bytes)

Dear Uncle John,
    Attached are a couple of pictures of the pirogue I built for my daughter from your kit. I built it at the maximum length from 1/4 in. plywood and Lauan. I change a few things like adding an inner sheer rail for stiffness and to provide a place to tie off things. The operator of this vessel is Christina and her first mate is Ben. Even though I used too much fiberglass on the bottom and it is a bit heavy, you can see that it draws only a few inches of water. This pictures were taken at Honeycomb Creek on the Tennessee River near Guntersville, Alabama.     The pirogue was fun to build and I would like to build another, soon.

Regards,

Michael in Huntsville, Alabama


click image to enlarge
3quarter.jpg (42558 bytes) bow.jpg (31497 bytes) side.jpg (31611 bytes)

Uncle John, 

Here are a few pictures of my recently completed Pirogue.  It is 15' 7" long and weighs about 68 pounds.  I used 1/4" exterior grade B-C Pine plywood.  I covered the entire outside and the inside floor with Fiberglass cloth, and put 3 coats of epoxy on the entire boat.  The epoxy and fiberglass materials were purchased from RAKA.  For the rubrails, I used 1"x2" pine with a rabbet cut so that the edge of the plywood would be hidden.  I also added a 1"x1 1/4" inwale.  I thought it gave it a nice finished look.  I added some deck plates and handles that I made out of maple and finished with a cherry wood finish.  For the finish, I painted the entire boat with 3 coats of Benjamin Moore Latex Deck & Porch paint.  It had epoxy in it so it bonded very well.  For seats I am using some cloth stadium seats that sit right on the floor.  They seem to work quite well, and they help to keep the weight low in the boat, which makes it feel very stable.  Overall, it was a very rewarding project.  It probably took me about 40 Hours to build and finish the boat, and cost around $250 for the materials including the kit.  The fiberglass work provided the greatest challenge.  My five year old son, Jacob, and I took our maiden voyage last week.  We were both grinning from ear to ear.  We're looking forward to many years of fun paddling.

 
Thanks,
Craig Churchville, NY

click image to enlarge
1.jpg (21702 bytes)
2.jpg (23811 bytes) 3.jpg (26397 bytes)

Dear Uncle John:
Here are some pictures of my new Piroque. Its 14ft 4in long. I fiberglassed the whole bottom and added 3 coats of epoxy because of the rocks in the rivers and creeks in NC where I live. This made it a little heavier than I would have liked but as you can see my wife and I had no trouble getting it on the old Explorer. I used oak Luan with clear outdoor polyurethane and cane canoe seats on the inside. And cherry stain poly on the outside. It really looks great and draws a lot of attention wherever it goes! Which by the way it traveled on the interstate just fine. You really need a belt sander for the scarf joints and the project over all. If anyone wants to discuss the ins and outs of building one they can e-mail me at phmmem43@cs.com

Thanks again for a great boat!


click image to enlarge
readenour.jpg (64433 bytes)

I FINALLY finished my pirogue and here is a picture for your web page! It took forever to build, but I kept getting distracted.  Could easily build one in a week if not constantly interrupted. My pirogue is 12' 10" long and I'm guessing weighs less than 50 pounds. It is a ton of fun to use because it is so easy to portage when fishing small Ozark creeks here in Missouri.  It has opened up a whole new set of places to fish that were unreachable before.  It is an excellent complement to my heavy aluminum canoe. The canoe is faster, but also much harder for one person to handle.  The pirogue has only been in the water for a week, but has already seen quite a bit of fishing action!  I look forward to helping my friends build theirs!

 
Thanks
Roger in Missouri

More photos? click here!


Send us your photos so that we can include you.

CLICK HERE TO ORDER

return to previous page

Visit our Home Page

Boats | Landsailer | Scroll Saw Patterns